Indulge Safely: The Imperative of Flour Heat Treatment for Your Chocolate Chip Cookie Dough Bites
Who can resist the allure of raw cookie dough? That creamy, sweet, chocolate-studded goodness is often a more tempting prospect than the baked cookies themselves. For years, we've been warned about the risks associated with raw eggs in traditional cookie dough. However, a less-discussed but equally important hazard lurks in an unexpected ingredient: *raw flour*. If you're passionate about whipping up delicious, safe
Easy No-Bake Chocolate Chip Cookie Dough Bites Recipe, understanding and implementing flour heat treatment is not just a recommendation—it's essential. This simple, yet crucial step transforms your favorite guilty pleasure into a worry-free delight, allowing you to savor every morsel with complete peace of mind.
Beyond the Eggs: Unmasking the Dangers of Raw Flour
For a long time, the primary concern with eating raw cookie dough revolved around the presence of raw eggs, which can carry *Salmonella*. Indeed, opting for eggless cookie dough recipes is a smart move to mitigate this particular risk. But what many home bakers overlook is the potential danger hidden within raw flour itself. Flour, regardless of whether it’s all-purpose, almond, or whole wheat, is an untreated agricultural product. It comes directly from grains harvested from fields, and like any crop, it can be exposed to various bacteria and pathogens from its environment.
The most common culprits found in raw flour are *E. coli* and *Salmonella*. These bacteria, if ingested, can lead to severe foodborne illnesses characterized by symptoms like abdominal cramps, diarrhea, nausea, vomiting, and fever. While cooking flour at high temperatures (as in baking cookies) effectively neutralizes these threats, consuming it raw bypasses this critical safety step. This is precisely why flour heat treatment becomes non-negotiable for any edible, no-bake dough, ensuring your indulgent
chocolate chip cookie dough bites are not just tasty, but genuinely safe.
The Essential Step: How to Heat Treat Flour for Safe Consumption
The good news is that rendering flour safe for consumption is incredibly easy and adds only a few minutes to your preparation time. The goal is to heat the flour to a temperature that kills any potential bacteria, typically around 160°F (71°C), without browning or toasting it too much, which could alter the flavor profile of your cookie dough.
Oven Method (Recommended for Consistency)
This is the most reliable method for evenly heating a larger batch of flour.
- Preheat Your Oven: Set your oven to 300-350°F (150-175°C). A slightly lower temperature for a bit longer can sometimes be better to avoid browning.
- Spread the Flour: Measure the amount of all-purpose flour your recipe calls for, plus a little extra (in case of minor loss during heating). Spread it thinly and evenly across a rimmed baking sheet. A thin layer ensures uniform heating.
- Bake (and Stir): Place the baking sheet in the preheated oven. Bake for 5-10 minutes. For optimal safety and even heating, gently stir the flour every 2-3 minutes to ensure all parts reach the desired temperature. The flour should smell slightly nutty but not show significant color change. Some experts even recommend checking the internal temperature with an instant-read thermometer, aiming for 160°F (71°C) in several spots.
- Cool Completely: This step is just as critical as the heating itself. Once baked, remove the flour from the oven and allow it to cool completely on the baking sheet before incorporating it into your dough. Using warm flour can melt your butter and sugars, leading to a greasy, unworkable dough. Patience here is key for perfect chocolate chip cookie dough bites.
Microwave Method (For Small Batches)
For smaller quantities of flour, the microwave can be a quick alternative, but it requires more attention to prevent scorching and ensure even heating.
- Microwave in Intervals: Place the flour in a microwave-safe bowl. Microwave on high for 30-second intervals, stirring thoroughly after each interval.
- Check Temperature: Continue microwaving and stirring until the flour reaches 160°F (71°C) when checked with an instant-read thermometer. This usually takes 1-2 minutes total, depending on your microwave's power and flour quantity.
- Cool Completely: Just like with the oven method, ensure the flour cools down entirely before mixing it into your dough ingredients.
By dedicating these few extra minutes to flour heat treatment, you eliminate the risk of foodborne illness, making your no-bake cookie dough truly safe to eat.
Crafting Your Irresistible Chocolate Chip Cookie Dough Bites
Once your flour is safely heat-treated and completely cooled, the rest of the process for making these delightful
chocolate chip cookie dough bites is wonderfully straightforward. The beauty of this no-bake snack lies in its simplicity and the pure joy it brings.
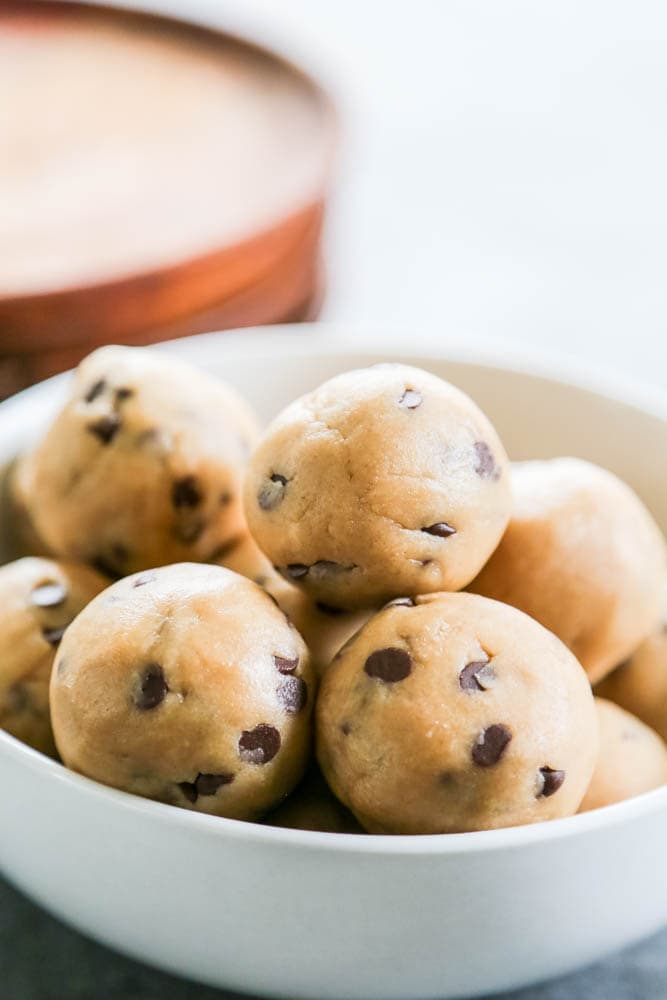
Start by gathering your simple ingredients: softened unsalted butter, a blend of brown and granulated sugars for that classic cookie flavor, vanilla extract, a pinch of salt, and, of course, plenty of chocolate chips. Mini chocolate chips are perfect for rolling the finished bites, adding an extra layer of chocolatey crunch and visual appeal.
The key to a perfect dough is creaming the softened butter with both sugars until the mixture is light, fluffy, and well-combined. This step incorporates air, contributing to a lighter texture in your cookie dough bites. Next, stir in the vanilla extract. Gradually add your cooled, heat-treated flour and salt mixture, mixing just until it’s combined. Overmixing can lead to a tougher texture. Finally, fold in your semi-sweet chocolate chips. If the dough feels a bit too crumbly or dry, don't panic! A tablespoon of milk (or dairy-free alternative) at a time can bring it to the perfect consistency where it holds together beautifully.
Use a small cookie scoop or your hands to form uniform, bite-sized balls. Rolling them in extra mini chocolate chips is optional but highly recommended for that extra touch of indulgence. A brief chill in the refrigerator for at least 30 minutes will firm up the bites, making them perfect for snacking.
Tips for Ultimate Enjoyment and Customization
Elevating your
chocolate chip cookie dough bites from great to absolutely unforgettable is all about paying attention to a few details and embracing creativity.
Perfecting the Texture
- Butter is Key: Ensure your unsalted butter is genuinely softened, but not melted. It should yield easily to pressure but still hold its shape. This state allows it to cream perfectly with the sugars, creating that desirable fluffy base.
- Combat Crumbly Dough: If your dough feels too dry and crumbly after mixing, resist the urge to add a lot of liquid at once. Add milk (dairy or non-dairy) one tablespoon at a time, mixing after each addition, until the dough comes together and can be easily formed into balls.
Storage and Freshness
For optimal flavor and texture, store your cookie dough bites in an airtight container in the refrigerator for up to a week. If you've made a large batch and want to enjoy them longer, they freeze beautifully for up to three months. Just remember to separate them with parchment paper on a baking sheet before freezing, and then transfer to a freezer-safe bag or container once solid. Thaw slightly at room temperature for a few minutes before indulging. For more detailed tips on storage, customization, and general enjoyment, check out our guide on
Store, Customize & Enjoy: Your Cookie Dough Bites Guide.
Unleash Your Creativity with Mix-Ins
While classic chocolate chip is always a winner, these bites are a fantastic canvas for experimentation:
- Nuts: Toasted pecans, walnuts, or slivered almonds add a delightful crunch.
- Dried Fruits: Chopped raisins, cranberries, or even dried cherries offer a chewy, sweet-tart contrast.
- Different Chocolates: White chocolate chips, dark chocolate chunks, or even a swirl of peanut butter chips can transform the flavor profile.
- Sprinkles: A festive touch for any occasion!
- Extracts: A drop of almond extract alongside the vanilla, or even a hint of peppermint, can create unique flavor combinations.
Conclusion: Savoring Sweetness, Safely
The joy of indulging in rich, creamy
chocolate chip cookie dough bites is unparalleled, especially when you know they're prepared with care and safety in mind. By incorporating the simple, yet vital, step of heat-treating your flour, you transform a potentially risky treat into a perfectly safe and utterly delicious snack. This small effort ensures that every bite offers pure, unadulterated pleasure, free from worry. So go ahead, whip up a batch, get creative with your mix-ins, and enjoy your new favorite no-bake delight, confident in the knowledge that you've mastered the art of safe and scrumptious edible cookie dough.